PMP application – Key takeaways
- Your PMP application should explain your experience clearly.
- Focus on project objectives, responsibilities, and outcomes.
- Keep project descriptions professional, accurate, and easy to understand.
- Avoid excessive jargon and unnecessarily lengthy project explanations.
- Make sure you document individual projects with accurate dates and details.
- Calculate experience months without counting overlaps twice.
- Verify PMI’s eligibility requirements before you submit your application.
- Keep education certificates and project records accessible and handy while filling out the application.
- Review every application section before submission.
- Follow PMI’s instructions for audits and exam scheduling.
A PMP application is where your project experience needs to speak for itself. You may have done everything related to the project, but explaining that experience on paper is another challenge altogether.
Your PMP application experience breakdown does not need to read like an academic paper or thesis. PMI needs to understand what you have managed. What responsibilities you handled and how you contributed. The simplest way to get your application approved is to not overcomplicate it!
Here’s how you write your PMP application without turning your project experience into a corporate vocabulary exercise.
How to write your PMP application?
Before you start, understand what PMI expects in your application. In this section, we provide a comprehensive step-by-step guide to writing your PMP application.
According to PMI’s official application checklist, each project needs:
- A brief project objective.
- A summary of project deliverables.
- A clear project outcome.
PMI also requires individual project entries. Routine operational tasks do not qualify as project experience.
Reference: PMI’s Official PMP Application Checklist
First, before you get into the experience section, Let’s understand all the steps to fill out the PMI application.
What to fill out in your PMP application
Once you click “Apply Now,” your application begins.
PMI will ask you for your education, e and training details. Each section requires accurate information. Your project experience deserves the most attention.
According to PMI’s application guidance, keep project entries separate. Each description should explain the objective and deliverables.
1. Academic education
Enter your highest completed education details.
Include your institution, qualification, and relevant dates. Make sure these details match your records.
2. Project management experience
This section requires your actual project experience.
PMI asks applicants to record projects individually. You should include the project title, organization, dates, and responsibilities.
Your project description should explain three things:
- Project objective: What was the project supposed to achieve?
- Your responsibilities: What did you lead or manage?
- Project outcome: What did the project deliver?
PMI recommends high-level project summaries. Please avoid routine operational responsibilities.
3. Project management training
Enter your project management education details.
Include your training provider, course information, and completed hours. Check your training certificate before entering details.
PMI requires 35 hours of project management training.
4. Review and submit
Review every section before submission.
Check project dates and education details. Confirm your experience descriptions are accurate.
PMI also allows applicants to save their application. You can return later and continue where you stopped.
Project Management Institute
PMI reference: PMP Application Experience Guide
How to fill out the PMP application Experience section
This is where your PMP application needs attention. Your project experience matters more than fancy descriptions. PMI needs to understand your responsibilities and project outcomes.
You might have managed several projects already. However, writing about them requires some preparation. Your experience description should explain the project clearly. It should also establish your role throughout the project.
Here’s what each field requires. Step by step –
1. A project title
Start with the actual project name. Avoid using your job designation here. Your project title should identify the specific initiative.
Eg. Project Title: Customer Relationship Management Implementation
2. Organization and job title
Enter the organization where you managed the project. Then provide your actual job title. Your designation does not need to be “Project Manager.” Focus on the responsibilities you handled.
3. Project dates
Enter the project start and completion dates. Check these dates against your project records.
Avoid guessing dates from memory; only put dates that are documented.
Your experience months should reflect actual project work. Overlapping projects do not create additional experience months.
4. Project description
This is the most important part; your project description should explain the project
- objective, responsibilities, and outcome.
Keep the explanation focused on your actual contribution.
Avoid copying your resume’s responsibility section. A resume summarizes your career. Your PMP application explains your project experience.
Here is how the same experience could look:
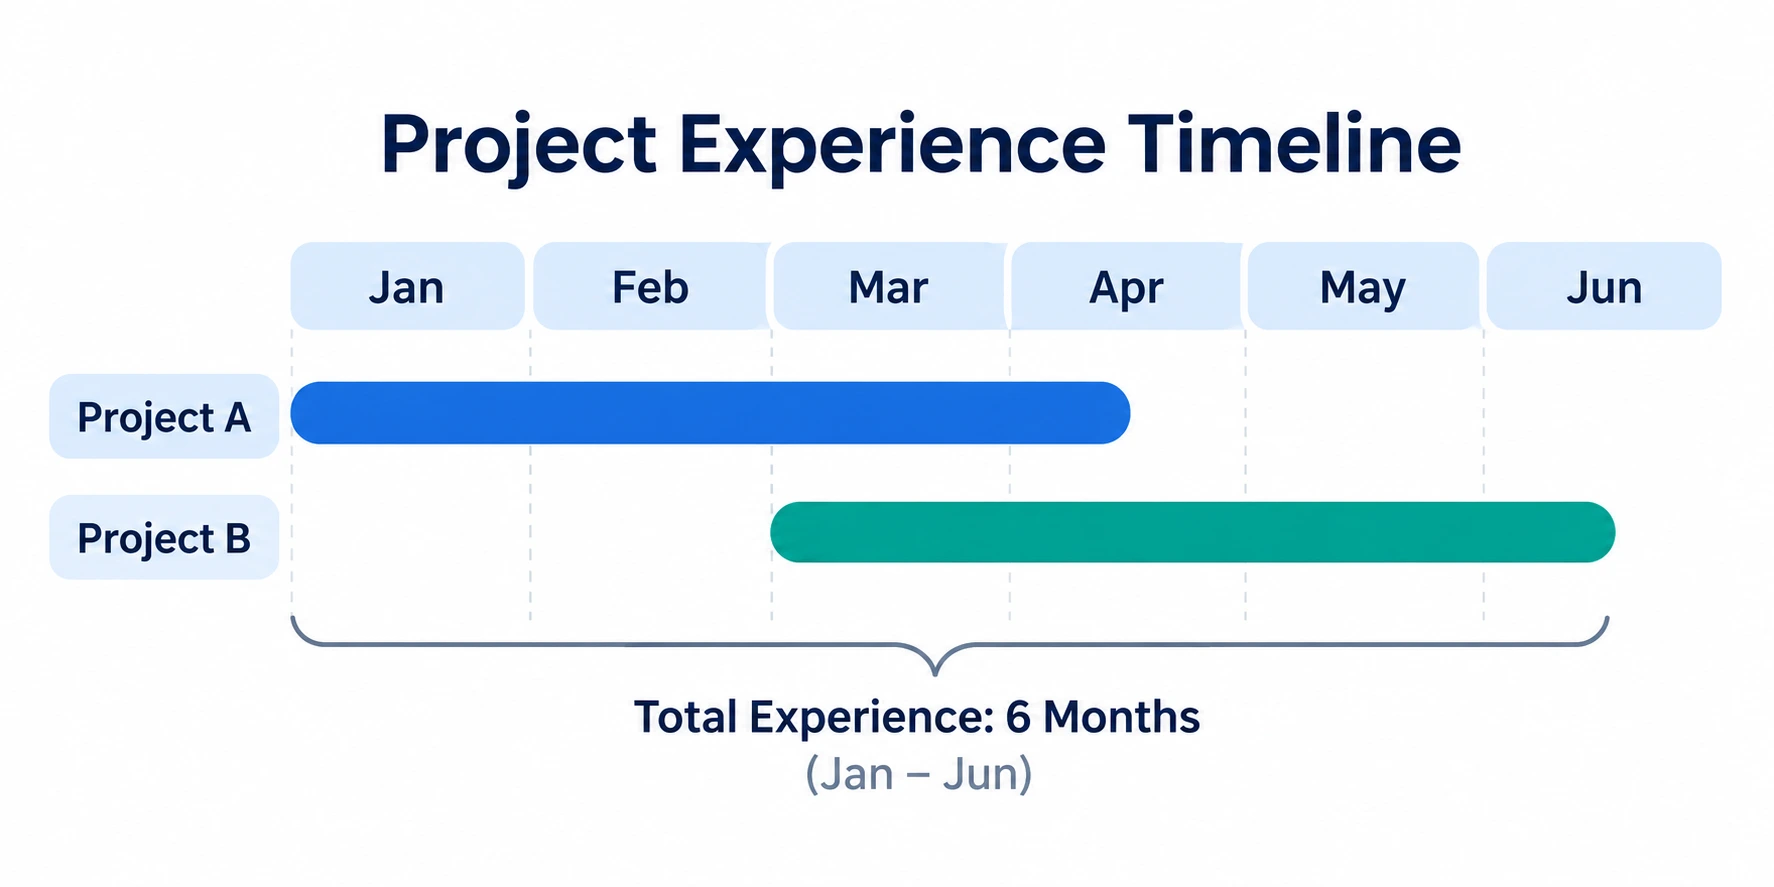
This example gives PMI a clearer picture. It explains the project without excessive technical details.
Your actual description should reflect your own responsibilities. Do not copy this example into your application.
What should you avoid in your experience description?
Keep these points in mind before submitting.
- Avoid describing routine operational activities.
- Do not copy your entire job description.
- Avoid vague statements about project success.
- Do not exaggerate your responsibilities.
- Keep project objectives and outcomes clearly defined.
Your experience description should be accurate and easy to understand. Every sentence should explain something useful about your project.
Remember: PMI needs your actual project experience. Complicated language does not make that experience stronger.
How to calculate your PMP project experience
Before you submit your PMP application, check your project experience months. Having several projects does not automatically mean more qualifying experience. PMI calculates experience based on your actual project dates.
Your project experience should meet PMI’s eligibility requirements. The required experience depends on your education and qualifying project management background.
1. Check your project start and end dates
Start by recording each project’s actual dates.
Use project records, schedules, or completion documents. Avoid estimating dates from memory.
Your experience calculation depends on the months you worked. Accurate dates help prevent mistakes in your application.
2. Understand how overlapping projects count
This is where many applicants get confused.
Suppose you managed two projects during the same period.
- Project A: January to April
- Project B: March to June
Both projects involved project management responsibilities. However, March and April overlap.
You cannot count those months twice. Your qualifying experience covers January through June. That gives you six calendar months, not eight.
3. Check your experience against PMI requirements
PMI’s current eligibility requirements depend on your education.
| Education | Required project management experience |
| Secondary school diploma | 60 months |
| Bachelor’s degree or higher | 36 months |
| GAC-accredited bachelor’s or postgraduate degree | 24 months |
Applicants also need 35 hours of project management education. A qualifying CAPM certification satisfies that education requirement.
These requirements reflect PMI’s current published eligibility criteria. Check the official page before submitting your application.
4. Calculate your qualifying experience
Use a simple timeline to understand your experience.
You managed Project A from January through April. You managed Project B from March through June.
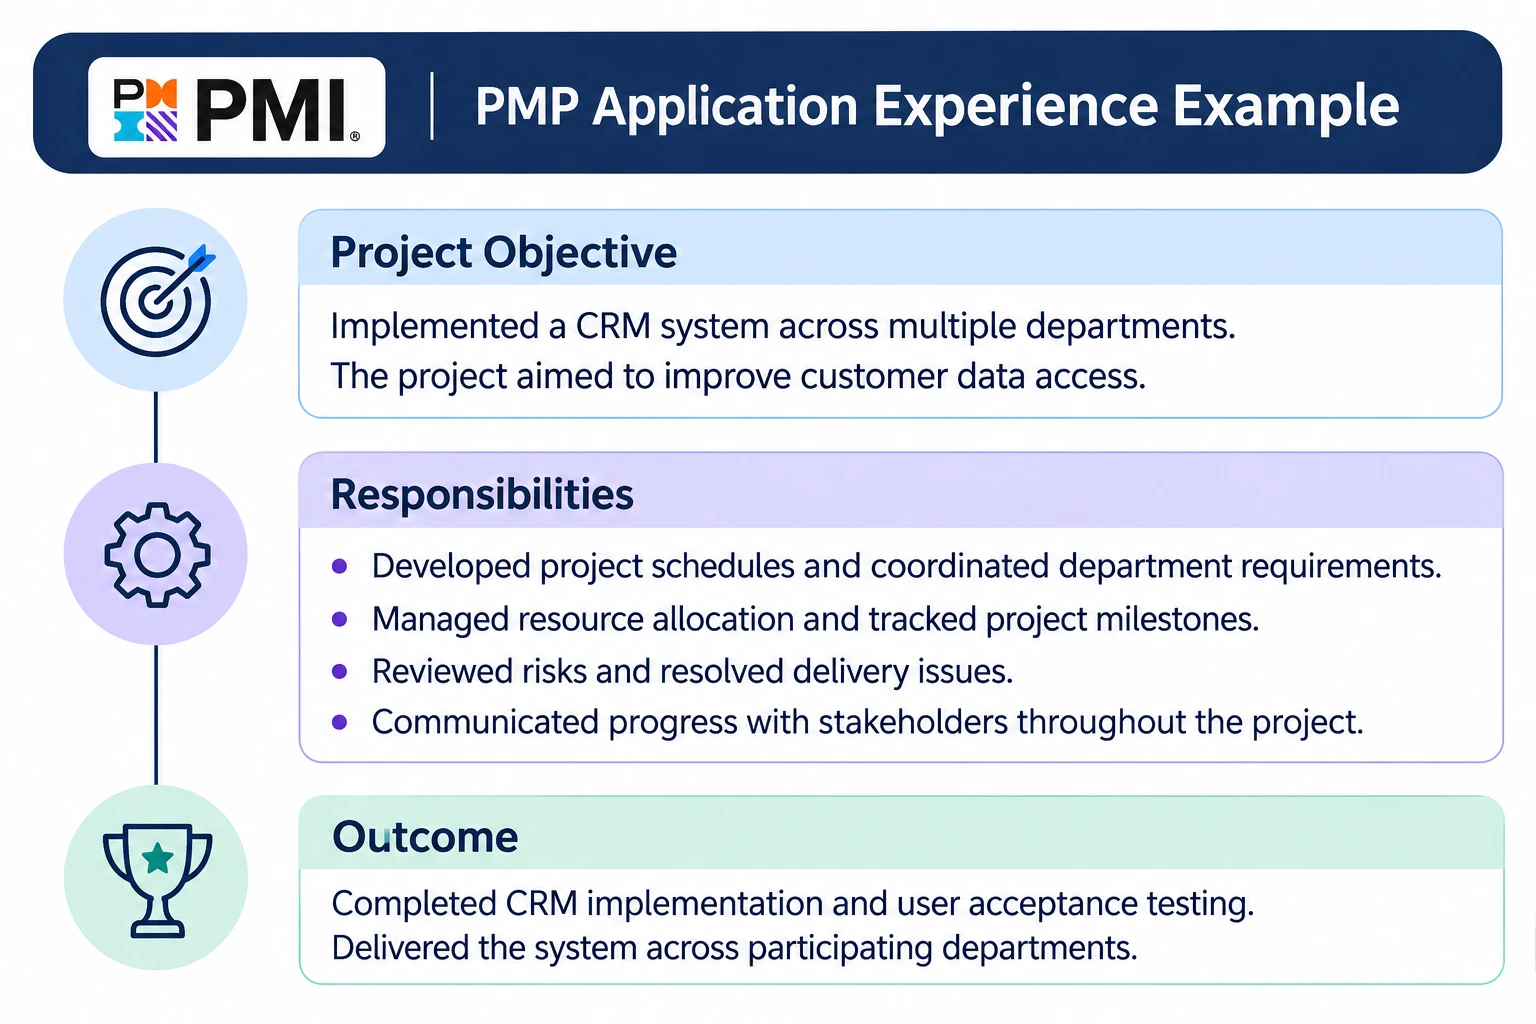
Your experience covers January through June.
The overlapping months count only once. Your total qualifying experience is six months.
5. Review your projects before submission
Check each and every project’s start and end dates.
Make sure your descriptions reflect your actual project work, and that your experience meets the requirements set by PMI.
Keep supporting documents accessible. These records help verify your application if selected for an audit.
Remember: Calculate experience using actual project dates. Do not add overlapping months twice.
What happens after you submit your PMP application?
Submitting your PMP application is not the final step. PMI reviews your information before approving your application. Once approved, you can pay and schedule your exam.
Step 1: Wait for PMI to review your application
After you submit it, PMI reviews your application details. This includes your education, project experience, and training information.
Keep an eye on your registered email address. PMI will notify you about your application status and next steps.
Step 2: Complete the PMI audit, if selected
Some PMP applications are selected for an audit. This is part of PMI’s certification process.
If selected, you need supporting documents. These include education certificates, training records, and verified project experience.
PMI provides 90 days to submit audit documents. Once received, the audit typically takes 5-7 business days.
You must complete the audit before proceeding.
Step 3: Pay your PMP certification fees
Once your application is accepted, you can pay.
Log in to your PMI account. Open your dashboard and follow the payment instructions on the dashboard, proceed with the payment.
Note: Check the current certification fee before proceeding. PMI membership and regional pricing affect the amount.
PMP certification fees differ for members and non-members; the price difference also applies and depends on your location.
With ProThoughts, we give our students a PMI PMP exam voucher. This is only applicable in India. This lowers the price from 46k to 44k.
Step 4: Schedule your PMP exam
After you complete the payment. PMI sends your eligibility information. Then you get to schedule your exam through Pearson VUE.
You get two options –
- Test center
- Online delivery
Availability depends on your location and exam options.
Your eligibility period lasts one year. You can take the exam up to three times during that period.
Step 5: Prepare for your PMP exam
Once your exam date is confirmed, follow your study plan.
Review the PMP Exam Content Outline. Practice questions and mock exams help assess your preparation.
Conclusion
Your PMP application should explain your experience very clearly.
Focus on project objectives, responsibilities, and outcomes. Avoid unnecessary jargon and lengthy descriptions.
Use accurate project information. Keep your supporting documents accessible. A well-prepared application makes the process easier. It also helps PMI better understand your experience.
PMP application : FAQs
After submitting your PMP application, you might have questions. Here are the answers to common application concerns.
1. How long does a PMP application review take?
PMI’s online application completeness review takes around five days. This timeline applies to applications without an audit.
2. How long does PMI take to approve a PMP application?
PMI reviews your application for completeness. Complete applications usually move forward within five days.
Applications selected for audit take longer. Your approval depends on successful verification. Therefore, include only factual, easily verifiable information.
3. How long does PMP application approval take after an audit?
PMI gives applicants 90 days to submit audit documents. After receiving the complete package, PMI typically takes 5–7 business days.
4. How do I check my PMP application status?
Step 1 – Log in to your PMI account.
Step 2 – Check your certification dashboard for application updates.
Also review your registered email address. PMI sends important application notifications there.
5. What happens if my PMP application is rejected?
If PMI rejects your PMP application, you will be notified by email. Review the notification carefully and identify what needs to be corrected.
Contact PMI for clarification. Avoid submitting another application until you understand the issue. Otherwise, the second application may also get rejected
6. How long do I have to complete my PMP application?
PMI gives applicants 90 days to complete an application. This period begins when you start the online application.
7. How long is my PMP exam eligibility valid?
Your eligibility period lasts one year. You can take the exam up to three times during that period.
If selected for audit, your eligibility starts after you successfully complete the audit.
ProThoughts provides PMP application assistance, feel free to connect with us via info@prothoughts.co.in!